
Card Android SDK
Integrating Android Card SDK in your application
Introduction
Before diving into the development process, it's essential to establish the prerequisites and criteria necessary for a successful build. In this step, we'll outline the specific Android requirements, including the minimum SDK version and other important details you need to consider. Let's ensure your project is set up for success from the very beginning.
Sample Demo
Step 1: Requirements
- A minimum Android SDK/API level of 24+
- In order to accept online payments on your application, you will need to add at least the Internet permission in the manifest file.
<uses-permission android:name="android.permission.INTERNET" /> //get internet access to complete online payments
Step 2: Get Your Public Keys
While you can certainly use the sandbox keys available within our sample app which you can get by following the installation process, however, we highly recommend visiting our onboarding page, there you'll have the opportunity to register your package name and acquire your essential Tap Key for activating Card-Android integration.
Step 3: Installation Using Gradle
- In your project gradle module, add the following:
allprojects {
    repositories {
        google()
        jcenter()
        maven { url 'https://jitpack.io' }
    }
}
Note that if you are on older Android Studio version, the above will be added in project's build.gradle. However, if you are using the latest version of Android studio you will have to add the above in setting.gradle
- Then to get the latest dependency add the following in either build.gradle or setting.gradle, depending on your Android Studio version:
dependencies {
  implementation : 'com.github.Tap-Payments:Card-Android:0.0.33'
}
Step 4: Integrating Card-Android
This integration offers two distinct options: a simple integration designed for rapid development and streamlined merchant requirements, and an advanced integration that adds extra features for a more dynamic payment integration experience.
Integration Flow
Noting that in Android Studio, you have the ability to create the UI part of the Card-Android by creating it as normal widget in your layout.xml then implement the functionality through code or fully create it by code. Below we will describe both flows:
- You will have to create a variable of type TapCardKit, which can be done in one of two ways:
- Created by XML and then linked to a variable in code.
- Created totally within the code.
- Once you create the variable in any way, you will have to follow these steps:
- Create the parameters.
- Pass the parameters to the variable.
- Implement TapCardStatusDelegate interface, which allows you to get notified by different events fired from within the Card SDK, also called callback functions.
- Start tokenizing a card on demand.
Initialising the UI
Note: You can initialise the Card-Android SDK either using XML for the layout then implementing the functionality through code or directly create everything through Code as provided below.
Using XML to create the Layout/UI
- Creating the TapCardKit using xml
- When you create a new project, Android studio creates for you activity_main.xml, where it shows a default blank screen.
- Add Card Form widget into your layout as follows:
Note: Height is set to wrap_content, to allow our card to expand and shrink based on the scenario. Like, showing/hiding the card name, etc.
<company.tap.tapcardformkit.open.web_wrapper.TapCardKit
        android:layout_width="match_parent"
        android:layout_height="wrap_content"
        android:id="@+id/tapCard"
        app:layout_constraintBottom_toBottomOf="parent"
        app:layout_constraintEnd_toEndOf="parent"
        app:layout_constraintStart_toStartOf="parent"
        app:layout_constraintTop_toTopOf="parent" />
- Accessing the Card From created in XML in your code
In order to access the card form that you just created, follow the below steps:- Go to your MainActivity class.
- Create a class variable that will be linked afterwards to the widget we created in the xml above.
/// A reference to link to the XML view created lateinit var tapCardForm: TapCardKit- In your onCreate method, link the created variable to the UI widget inside the XML.
override fun onCreate(savedInstanceState: Bundle?) {
	super.onCreate(savedInstanceState)
	setContentView(R.layout.activity_main)
	/// Here we attach the variable to the created view in the xml by providing the same id
	/// we hade inside the xml view we created above
	tapCardForm =  findViewById<TapCardKit>(R.id.tapCard)
	/// Let us create the parameters to configure our card form
	configureCardForm()
}
Using Code to create the Layout/UI
-
Creating the TapCardKit from code
- When you generate a new project, Android Studio creates a default layout file activity_main.xml, we will have to open it up and add an id parameter for the parent layout so we can reference the layout and add to it, our created TapCardKit widget. We have used in this sample, LinearLayout for simplicity.
<?xml version="1.0" encoding="utf-8"?> <LinearLayout xmlns:android="[http://schemas.android.com/apk/res/android](http://schemas.android.com/apk/res/android)" android:layout_width="match_parent" android:orientation="vertical" android:id="@+id/linearparent" android:layout_height="match_parent"> </LinearLayout>- Head to the auto-generated file MainActivity.kt and do the following:
- Create a class variable as follows
/// A reference to link to the XML view created lateinit var tapCardForm: TapCardKit - Create and inflate the variable in the auto-created onCreate function:
override fun onCreate(savedInstanceState: Bundle?) {
  super.onCreate(savedInstanceState)
  setContentView(R.layout.activity_main)
  /// We will have to create the layout parameters (widht & height) by code now
  val linearLayoutParams = LinearLayout.LayoutParams(
    LinearLayout.LayoutParams.WRAP_CONTENT, LinearLayout.LayoutParams.WRAP_CONTENT
  )
  // Apply the layout parameters we configured to our varibale. Preparing it to be correctly inflated
  tapCardForm  = TapCardKit(this)
  tapCardForm.layoutParams = linearLayoutParams
  // Now you need to add the widget to the layout, using the id we created in the last step
  this.findViewById<LinearLayout>(R.id.linearparent).addView(tapCardForm)
  /// Let us create the parameters to configure our card form
  configureCardForm()
}
- Create a class variable as follows
Simple Integration
Here, you'll discover a comprehensive table featuring the parameters applicable to the simple integration. Additionally, you'll explore the various methods for integrating the SDK, either using XML to create the layout and then implementing the controllers functionalities by code, or directly using code. Furthermore, you'll gain insights into card tokenization after the initial payment and learn how to receive the callback notifications.
Parameters
Each parameter is linked to the reference section, which provides a more in depth explanation of it.
| Parameter | Description | Required | Type | Sample |
|---|---|---|---|---|
| operator | Key obtained after registering your package name, also known as Public key | True | String | var operator=HashMap\<String,Any>(),operator.put( "publicKey","pk_test_YhUjg9PNT8oDlKJ1aE2fMRz7") |
| scope | Defines the intention of using Card-Android | True | String | var scope:String = "Token" |
| purpose | Defines the intention of using the generated Token | True | String | var purpose:String = "Transaction" |
| order | Order details linked to the token | True | Dictionary | var order = HashMap\<String, Any>(), order.put("id","") order.put("amount",1),order.put("currency","SAR"), order.put("description",""), order.put("reference":"A reference to this order in your system")) |
| customer | Customer details for tokenization process | True | Dictionary | var customer = HashMap\<String,Any> ,customer.put("id,""), customer.put("nameOnCard","Tap Payments"),customer.put("editable",true),) var name :HashMap\<String,Any> = \[["lang":"en","first":"TAP","middle":"", "last":"PAYMENTS"]] "contact":\["email":"[[email protected]](mailto:[email protected])", "phone":["countryCode":"+965","number":"88888888"]]] customer.put("name",name) , customer.put("contact",contact)\ |
Configuring the Card-Android SDK
After creating the UI using any of the previously mentioned ways, it is time to pass the parameters needed for the SDK to work as expected and serve your need correctly.
-
Creating the parameters
To allow flexibility and to ease the integration, your application will only has to pass the parameters as aHashMap<String,Any>().
First, let us create the required parameters:val configuration = LinkedHashMap<String,Any>() /** * operator */ val operator = HashMap<String,Any>() operator.put("publicKey","") /** * order */ val order = HashMap<String,Any>() order.put("id", "") order.put("amount", "1") order.put("currency","SAR") order.put("description","") order.put("reference","") /** * phone */ val phone = java.util.HashMap<String,Any>() phone.put("countryCode","+20") phone.put("number","011") /** * contact */ val contact = java.util.HashMap<String,Any>() contact.put("email","[email protected]") contact.put("phone",phone) /** * name */ val name = java.util.HashMap<String,Any>() name.put("lang","en") name.put("first", "first") name.put("middle", "middle") name.put("last", "last") /** * customer */ val customer = java.util.HashMap<String,Any>() customer.put("nameOnCard", "test") customer.put("editable",true) customer.put("contact",contact) customer.put("name", listOf(name)) configuration.put("operator",operator) configuration.put("scope","Authenticate") configuration.put("order",order) configuration.put("customer",customer) -
Pass these parameters to the created Card Form variable before as follows
/// This static interface is provided publicly from the Card-Android SDK to pass the parameters. It takes 4 parameters /// 1. Conext. Which is your building context of the current activity /// 2. The view of type CardKit we created before. /// 3. The parameters we created before. /// 4. A class that implements TapCardStatusDelegate (more on this later) TapCardConfiguration.configureWithTapCardDictionaryConfiguration( this, tapCardForm, configuration,this)
Full code snippet for creating the parameters + passing it TapCardKit variable
/// A sample function showing how to integrate and configure the TapCardKit with minimal data required
fun configureCardForm() {
// optionally call this function if you want to use the scanner functionality before configuring the card form.
checkAndRequestPermissions()
val configuration = LinkedHashMap<String,Any>()

/**
         * operator
         */
val operator = HashMap<String,Any>()
operator.put("publicKey","")
/**
         * order
         */
val order = HashMap<String,Any>()
order.put("id", "")
order.put("amount", "1")
order.put("currency","SAR")
order.put("description","")
order.put("reference","")
/**
         * phone
         */
val phone = java.util.HashMap<String,Any>()
phone.put("countryCode","+20")
phone.put("number","011")

/**
         * contact
         */
val contact = java.util.HashMap<String,Any>()
contact.put("email","[email protected]")
contact.put("phone",phone)
/**
         * name
         */
val name = java.util.HashMap<String,Any>()
name.put("lang","en")
name.put("first", "first")
name.put("middle", "middle")
name.put("last",  "last")
/**
         * customer
         */
val customer = java.util.HashMap<String,Any>()
customer.put("nameOnCard", "test")
customer.put("editable",true)
customer.put("contact",contact)
customer.put("name", listOf(name))

configuration.put("operator",operator)
configuration.put("scope","Authenticate")
configuration.put("order",order)
configuration.put("customer",customer)
TapCardConfiguration.configureWithTapCardDictionaryConfiguration(
this,
tapCardForm,
configuration,this)/// optionally call this function if you want to use the scanner functionality before configuring the card form.
fun checkAndRequestPermissions(): Boolean {
val camera = ContextCompat.checkSelfPermission(
this,
Manifest.permission.CAMERA
)
val listPermissionsNeeded: MutableList<String> = ArrayList()
if (camera != PackageManager.PERMISSION_GRANTED) {
listPermissionsNeeded.add(Manifest.permission.CAMERA)
}
if (!listPermissionsNeeded.isEmpty()) {
ActivityCompat.requestPermissions(
this,
listPermissionsNeeded.toTypedArray(),
REQUEST_ID_MULTIPLE_PERMISSIONS
)
return false
}
return true
}Tokenise the card
A token is like a secret code that stands in for sensitive info, like credit card data. Instead of keeping the actual card info, we use this code. Tokens are hard for anyone to understand if they try to peek, making it a safer way to handle sensitive stuff.
Following the above code samples, once the TapCardKit now has a valid input, you will be able to start the tokenization process by calling the public interface which you can find by following Step 5 - Tokenize the card.
Receiving Callback Notifications
Now we have created the UI and the parameters required to to correctly display Tap card form. For the best experience, your class will have to implement TapCardStatusDelegate interface, which is a set of optional callbacks, that will be fired based on different events from within the card form. This will help you in deciding the logic you need to do upon receiving each event. Kindly follow the below steps in order to complete the mentioned flow:
- Go back to MainActivity.kt file
- Head to the class declaration line
- Add TapCardStatusDelegate
- Override the required callbacks as follows:
/// Will be fired whenever there is an error related to the card connectivity or apis
/// - Parameter data: includes a JSON format for the error description and error
override fun onError(error: String) {
  Log.i("log",error)
}
/**
 Will be fired whenever the card sdk finishes successfully the task assigned to it. Whether `TapToken` or `AuthenticatedToken`
 - Parameter data: will include the data in JSON format. For `TapToken`:
 			{
         "id": "tok_MrL97231045SOom8cF8G939",
         "created": 1694169907939,
         "object": "token",
         "live_mode": false,
         "type": "CARD",
         "source": "CARD-ENCRYPTED",
         "used": false,
         "card": {
             "id": "card_d9Vj7231045akVT80B8n944",
             "object": "card",
             "address": {},
             "funding": "CREDIT",
             "fingerprint": "gRkNTnMrJPtVYkFDVU485Gc%2FQtEo%2BsV44sfBLiSPM1w%3D",
             "brand": "VISA",
             "scheme": "VISA",
             "category": "",
             "exp_month": 4,
             "exp_year": 24,
             "last_four": "4242",
             "first_six": "424242",
             "name": "AHMED",
             "issuer": {
                "bank": "",
                "country": "GB",
                "id": "bnk_TS07A0720231345Qx1e0809820"
            }
         },
         "url": ""
     }
 */
override fun onSuccess(data: String) {
  Log.i("log",data)

}
/**
 *  Will be fired whenever the validity of the card data changes.
 *  Parameter isValid: Will be true if the card data is valid and false otherwise.
 */
override fun onValidInput(isValid: String) {
  Log.i("log",isValid)
}
Note: At this point, your MainActivity.kt file should look like this:
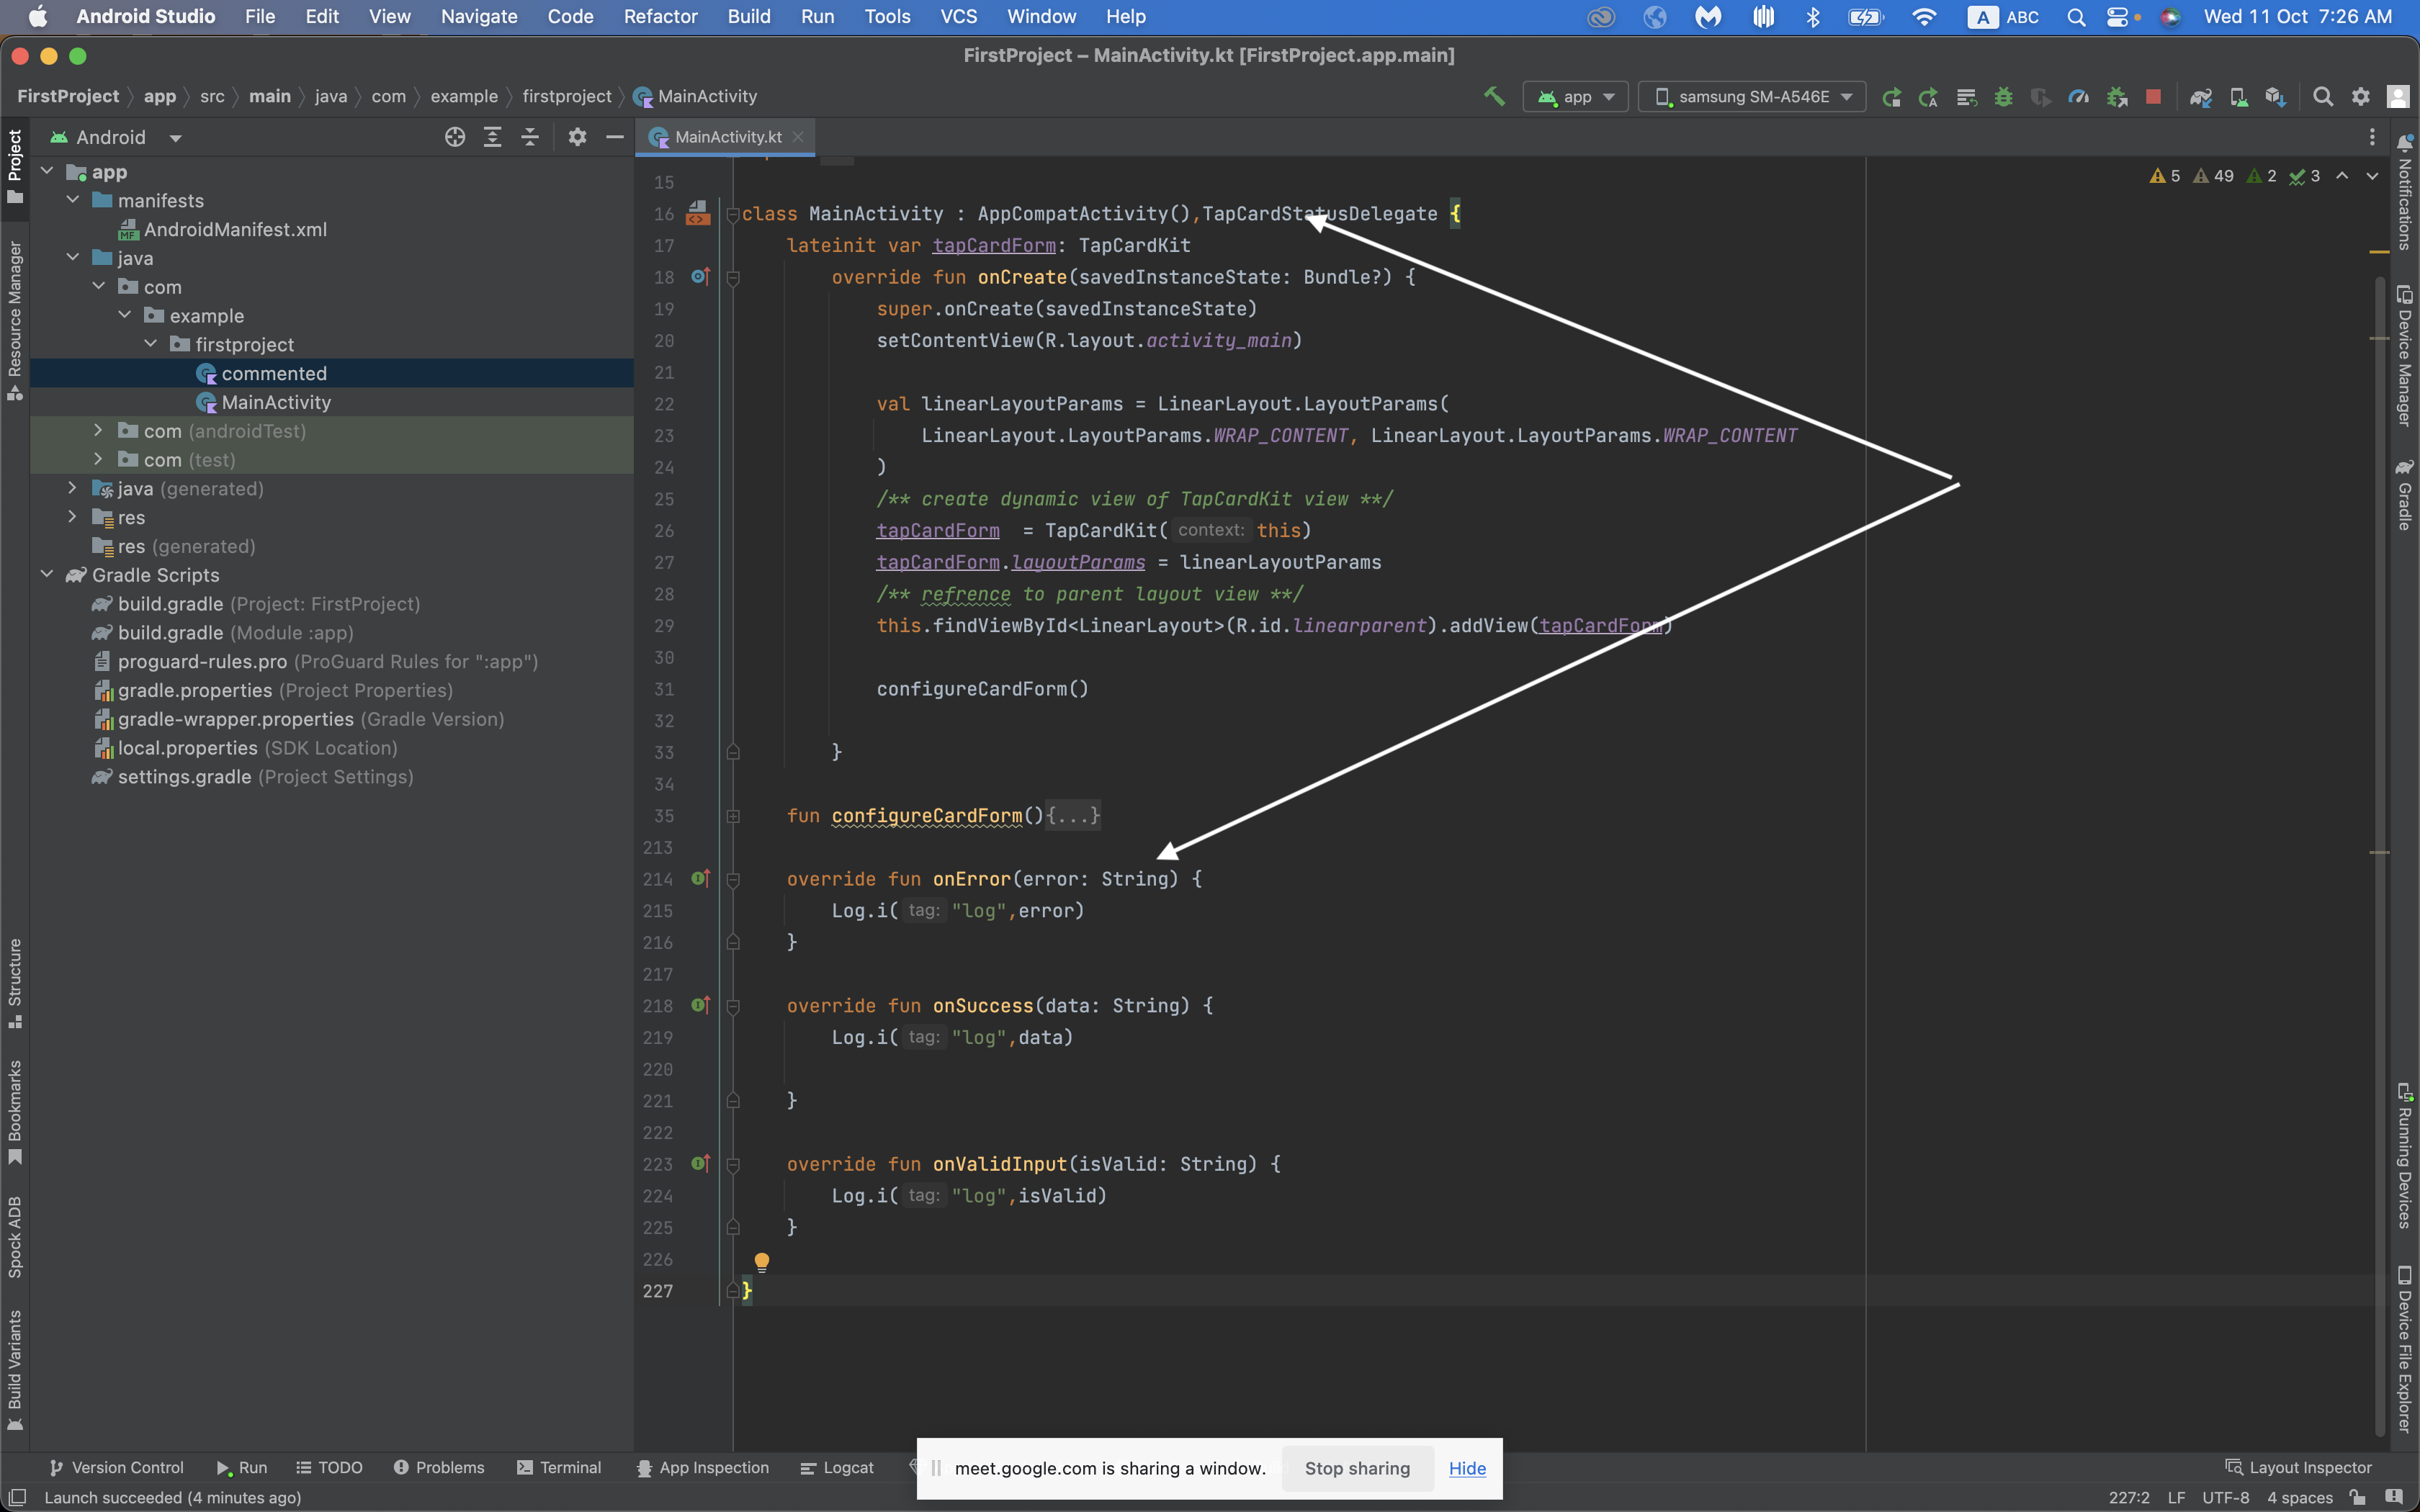
Advanced Integration
The advanced configuration for the Card-Android integration not only has all the features available in the simple integration but also introduces new capabilities, providing merchants with maximum flexibility. You can find a code below, where you'll discover comprehensive guidance on implementing the advanced flow as well as a complete description of each parameter.
Parameters
Each parameter is linked to the reference section, which provides a more in depth explanation of it.
| Parameter | Description | Required | Type | Sample |
|---|---|---|---|---|
| operator | Key obtained after registering your package name | True | String | var operator=HashMap\<String,Any>(),operator.put( "publicKey","pk_test_YhUjg9PNT8oDlKJ1aE2fMRz7") |
| scope | Defines the intention of using Card-Android | True | String | var scope:String = "Token" |
| purpose | Defines the intention of using the generated Token | True | String | var purpose:String = "Transaction" |
| order | Order details linked to the token | True | Dictionary | var order = HashMap\<String, Any>(), order.put("id","") order.put("amount",1),order.put("currency","SAR"), order.put("description",""), order.put("reference":"A reference to this order in your system")) |
| invoice | Invoice id to link to the token (optional) | False | Dictionary | var invoice = HashMap\<String,Any>.put("id","") |
| merchant | Merchant id obtained after registering your bundle id | True | Dictionary | var merchant = HashMap\<String,Any>.put("id","") |
| customer | Customer details for tokenization process | True | Dictionary | var customer = HashMap\<String,Any> ,customer.put("id,""), customer.put("nameOnCard","Tap Payments"),customer.put("editable",true),) var name :HashMap\<String,Any> = \[["lang":"en","first":"TAP","middle":"", "last":"PAYMENTS"]] "contact":\["email":"[[email protected]](mailto:[email protected])", "phone":["countryCode":"+965","number":"88888888"]]] customer.put("name",name) , customer.put("contact",contact) |
| features | Extra features for customization (optional) | False | Dictionary | var features=HashMap\<String,Any> , features.add("scanner":true), features.add("acceptanceBadge":true), features.add ("customerCards":HashMapof("saveCard":false, "autoSaveCard":false),features.add( "alternativeCardInputs":HashMapof("cardScanner":true, "cardNFC":true) |
| acceptance | Acceptance details for the transaction (optional) | False | Dictionary | var acceptance = HashMap\<String,Any> , acceptance.put("supportedSchemes",["AMERICAN_EXPRESS","VISA","MASTERCARD", "OMANNET","MADA"]), acceptance.put("supportedFundSource",["CREDIT","DEBIT"]), acceptance.put("supportedPaymentAuthentications",["3DS"]) |
| fieldVisibility | Visibility of optional fields in the card form (optional) | False | Dictionary | var fieldVisibility = HashMap\<String,Any> ,fieldVisibility.put("cardHolder",true) |
| interface | Look and feel related configurations (optional) | False | Dictionary | var interface = HashMap\<String,Any> , interface.put("locale","en"), interface.put("theme","light"), interface.put("edges","curved"), interface.put("direction","dynamic"), interface.put(powered,true), interface.put("colorStyle","colored"), interface.put("loader",true) // Allowed values for theme : light/dark. locale: en/ar, edges: curved/flat, direction:ltr/dynaimc,colorStyle:colored/monochrome |
| post | Webhook for server-to-server updates (optional) | False | Dictionary | var post = HashMap\<String,Any>.put("url","") |
Initialisation of the input
You can use a Dictionary HashMap to send data to our SDK. The benefit is that you can generate this data from one of your APIs. If we make updates to the configurations, you can update your API, avoiding the need to update your app on the Google Play Store.
     /**
       * operator
       */
      val operator = HashMap<String,Any>()
        operator.put("publicKey","pk_test_YhUjg9PNT8oDlKJ1aE2fMRz7")

        /**
         * merchant
         */
        val merchant = HashMap<String,Any>()
        merchant.put("id","")

        /**
         * invoice
         */
        val invoice = java.util.HashMap<String,Any>()
        invoice.put("id","")
        /**
         * post
         */
        val post = java.util.HashMap<String,Any>()
        post.put("url","")


        /**
         * phone
         */
        val phone = HashMap<String,Any>()
        phone.put("countryCode","+20")
        phone.put("number","011")

        /**
         * contact
         */
        val contact = HashMap<String,Any>()
        contact.put("email","[email protected]")
        contact.put("phone",phone)
        /**
         * name
         */
        val name = HashMap<String,Any>()
        name.put("lang","en")
        name.put("first","Tap")
        name.put("middle","")
        name.put("last","Payment")

        /**
         * customer
         */
        val customer = HashMap<String,Any>()
        customer.put("nameOnCard","")
        customer.put("editable",true)
        customer.put("contact",contact)
        customer.put("name", listOf(name))


        /**
         * acceptance
         */
        val acceptance = HashMap<String,Any>()
        acceptance.put("supportedSchemes", listOf("MADA","VISA","MASTERCARD","AMEX"))
        acceptance.put("supportedFundSource",listOf("CREDIT","DEBIT"))
        acceptance.put("supportedPaymentAuthentications",listOf("3DS"))

        /**
         * fields
         */
        val fieldVisibility = HashMap<String,Any>()

        /**
         * card
         */
        val card = HashMap<String,Any>()
         card.put("cvv",true)
         card.put("cardHolder",true)
        fieldVisibility.put("card",card)

        /**
         * customerCards
         */
        val customerCards = HashMap<String,Any>()
        customerCards.put("saveCard",true)
        customerCards.put("autoSaveCard",true)

        /**
         * alternative cards
         */
        val alternativeCardInput = HashMap<String,Any>()
        alternativeCardInput.put("cardScanner",true)
        alternativeCardInput.put("cardNFC",true)
        /**
         * features
         */
        val features = HashMap<String,Any>()
        features.put("acceptanceBadge",true)
        features.put("customerCards",customerCards)
        features.put("alternativeCardInputs",alternativeCardInput)


        /**
         * order
         */
        val order = HashMap<String,Any>()
        order.put("id","order_id")
        order.put("amount","1")
        order.put("currency","SAR")
        order.put("description","description")
        order.put("reference","refrence_id")

        /**
         * interface
         */
        val tapInterface = HashMap<String,Any>()
        tapInterface.put("locale","en")
        tapInterface.put("theme","light")
        tapInterface.put("edges","curved")
        tapInterface.put("cardDirection","dynamic")
        tapInterface.put("powered",true)
        tapInterface.put("colorStyle","colored")
        tapInterface.put("loader",true)


        /**
         * configuration request
         */

        val configuration = LinkedHashMap<String,Any>()
        configuration.put("operator", operator)
        configuration.put("merchant",merchant)
        configuration.put("transaction",transaction)
        configuration.put("order",order)
        configuration.put("invoice",invoice)
        configuration.put("post",post)
        configuration.put("purpose","PAYMENT_TRANSACTION")
        configuration.put("fieldVisibility",fields)
        configuration.put("features",features)
        configuration.put("redirect",redirect)
        configuration.put("acceptance",acceptance)
        configuration.put("interface",tapInterface)
        configuration.put("scope","Authenticate") // or  configuration.put("scope","Token")
        configuration.put("customer",customer)
Receiving Callback Notifications (Advanced Version)
The below will allow the integrators to get notified from events fired from the TapCardKit.
interface TapCardStatusDelegate {


    override fun onSuccess(data: String)
/**
        Will be fired whenever the card sdk finishes successfully the task assigned to it. Whether `TapToken` or `AuthenticatedToken`
     - Parameter data: will include the data in JSON format. For `TapToken`:
     {
         "id": "tok_MrL97231045SOom8cF8G939",
         "created": 1694169907939,
         "object": "token",
         "live_mode": false,
         "type": "CARD",
         "source": "CARD-ENCRYPTED",
         "used": false,
         "card": {
             "id": "card_d9Vj7231045akVT80B8n944",
             "object": "card",
             "address": {},
             "funding": "CREDIT",
             "fingerprint": "gRkNTnMrJPtVYkFDVU485Gc%2FQtEo%2BsV44sfBLiSPM1w%3D",
             "brand": "VISA",
             "scheme": "VISA",
             "category": "",
             "exp_month": 4,
             "exp_year": 24,
             "last_four": "4242",
             "first_six": "424242",
             "name": "AHMED",
             "issuer": {
                "bank": "",
                "country": "GB",
                "id": "bnk_TS07A0720231345Qx1e0809820"
            }
         },
         "url": ""
     }
     */

    override fun onReady()
    /**
     *  Will be fired whenever the card is rendered and loaded
     */

    override fun onFocus()
    /**
     *  Will be fired once the user focuses any of the card fields
     */


    override fun onBindIdentification(data: String)
/** - Parameter data: will include the data in JSON format. example :
     *{
        "bin": "424242",
        "bank": "",
        "card_brand": "VISA",
        "card_type": "CREDIT",
        "card_category": "",
        "card_scheme": "VISA",
        "country": "GB",
        "address_required": false,
        "api_version": "V2",
        "issuer_id": "bnk_TS02A5720231337s3YN0809429",
        "brand": "VISA"
     }*     */

    override fun onValidInput(isValid: String)
    /**
     *  Will be fired whenever the validity of the card data changes.
     *  Parameter isValid: Will be true if the card data is valid and false otherwise.
     */


    override fun onError(error: String)=
   /**
     *  Will be fired whenever there is an error related to the card connectivity or apis
     *  Parameter data: includes a JSON format for the error description and error
     */

    override fun onHeightChange(heightChange:String)
   /**
     *  Will be fired whenever the card element changes its height for your convience
     *   Parameter height: The new needed height
     */

}
Step 5: Tokenize the Card
The Card-Adroid SDK provides a public interface that allows you to instruct it to start the tokenization process on demand or whenever you see convenient, in your logic flow. As a guidance we would only recommend calling this interface after getting onValidInput callback as described above and shown in the code block below.
Tokenize the Card
What is a Token?A token is like a secret code that stands in for sensitive info, like credit card data. Instead of keeping the actual card info, we use this code. Tokens are hard for anyone to understand if they try to peek, making it a safer way to handle sensitive stuff.
What is Tokenization of a Card?Card tokenization is like changing your credit card into a secret code. You can use this code safely without showing your actual card info. It's a common practice in payments to keep things secure and prevent your card details from being seen by others.
Why Do I Need to Tokenize a Card?There are several reasons to tokenize a card:
- Security
Tokenization helps protect sensitive card data, reducing the risk of data breaches or unauthorized access.- Compliance
Many regulations and industry standards, like PCI DSS, require the use of tokenization to safeguard cardholder data.- Recurring Payments
Tokens are useful for recurring payments, as they allow you to charge a customer's card without storing their actual card details.- Convenience
Tokens simplify payment processing, as you only need to deal with tokens instead of card numbers.
/// In this example, we will assume that you want to generate the token, once the user fills in correct and valid card data
override fun onValidInput(isValid: String) {
        Log.i("log", isValid)
        when (isValid.toBoolean()) {
            true -> tapCardForm.generateTapToken()
            false -> {}
        }

    }
Also, once you correctly trigger the interface, you should expect to hear back from the SDK in one of two callbacks, onSuccess or onError.
Full Code Sample
Once all of the above steps are successfully completed, your MainAcitivyt.kt file should look like this:
package com.example.firstproject

import android.Manifest
import android.content.pm.PackageManager
import androidx.appcompat.app.AppCompatActivity
import android.os.Bundle
import android.util.Log
import android.view.View
import android.widget.LinearLayout
import android.widget.TextView
import android.widget.Toast
import androidx.constraintlayout.widget.ConstraintLayout
import androidx.core.app.ActivityCompat
import androidx.core.content.ContextCompat
import company.tap.tapcardformkit.open.DataConfiguration
import company.tap.tapcardformkit.open.TapCardStatusDelegate
import company.tap.tapcardformkit.open.web_wrapper.TapCardConfiguration
import company.tap.tapcardformkit.open.web_wrapper.TapCardKit
import java.util.ArrayList

class MainActivity : AppCompatActivity(), TapCardStatusDelegate {
    lateinit var tapCardForm: TapCardKit
    val REQUEST_ID_MULTIPLE_PERMISSIONS = 7

    override fun onCreate(savedInstanceState: Bundle?) {
        super.onCreate(savedInstanceState)
        setContentView(R.layout.activity_main)

        checkAndRequestPermissions()

        val linearLayoutParams = LinearLayout.LayoutParams(
            LinearLayout.LayoutParams.WRAP_CONTENT, LinearLayout.LayoutParams.WRAP_CONTENT
        )
        /** create dynamic view of TapCardKit view **/
        tapCardForm = TapCardKit(this)
        tapCardForm.layoutParams = linearLayoutParams
        /** refrence to parent layout view **/
        this.findViewById<LinearLayout>(R.id.linearparent).addView(tapCardForm)

        configureCardForm()

    }

    fun configureCardForm() {
        /**
         * phone
         */
        val phone = java.util.HashMap<String, Any>()
        phone.put("countryCode", "+20")
        phone.put("number", "011")

        /**
         * contact
         */
        val contact = java.util.HashMap<String, Any>()
        contact.put("email", "[email protected]")
        contact.put("phone", phone)
        /**
         * name
         */
        val name = java.util.HashMap<String, Any>()
        name.put("lang", "en")
        name.put("first", "first")
        name.put("middle", "middle")
        name.put("last", "last")

        val configuration = LinkedHashMap<String, Any>()

        /**
         * operator
         */
        val operator = HashMap<String, Any>()
        operator.put("publicKey", "pk_test_YhUjg9PNT8oDlKJ1aE2fMRz7")
        /**
         * order
         */
        val order = HashMap<String, Any>()
        order.put("id", "")
        order.put("amount", "1")
        order.put("currency", "SAR")
        order.put("description", "")
        order.put("reference", "")

        /**
         * customer
         */
        val customer = java.util.HashMap<String, Any>()
        customer.put("nameOnCard", "test")
        customer.put("editable", true)
        customer.put("contact", contact)
        customer.put("name", listOf(name))

        configuration.put("operator", operator)
        configuration.put("scope", "Authenticate")
        configuration.put("order", order)
        configuration.put("customer", customer)

        TapCardConfiguration.configureWithTapCardDictionaryConfiguration(
            this,
            tapCardForm,
            configuration, this
        )
    }

    private fun checkAndRequestPermissions(): Boolean {
        val camera = ContextCompat.checkSelfPermission(
            this,
            Manifest.permission.CAMERA
        )
        val listPermissionsNeeded: MutableList<String> = ArrayList()
        if (camera != PackageManager.PERMISSION_GRANTED) {
            listPermissionsNeeded.add(Manifest.permission.CAMERA)
        }
        if (!listPermissionsNeeded.isEmpty()) {
            ActivityCompat.requestPermissions(
                this,
                listPermissionsNeeded.toTypedArray(),
                REQUEST_ID_MULTIPLE_PERMISSIONS
            )
            return false
        }
        return true
    }


    override fun onError(error: String) {
        Log.i("log", error)
    }

    override fun onSuccess(data: String) {
        Log.i("log", data)

    }


    override fun onValidInput(isValid: String) {
        Log.i("log", isValid)
        when (isValid.toBoolean()) {
            true -> tapCardForm.generateTapToken()
            false -> {}
        }

    }

}
Parameters Reference
Below you will find more details about each parameter shared in the above tables that will help you easily integrate Card-Android SDK.
operator
- Definition: It links the payment gateway to your merchant account with Tap, in order to know your business name, logo, etc...
- Type: string (required)
- Fields:
- publicKey
Definition: This is a unique public key that you will receive after creating an account with Tap which is considered a reference to identify you as a merchant. You will receive 2 public keys, one for sandbox/testing and another one for production.
Example:var operator=HashMap\<String,Any>(),operator.put("publicKey","pk_test_YhUjg9PNT8oDlKJ1aE2fMRz7")\`
- publicKey
scope
- Definition: This is used in order to identify the type of token you want to generate. A token is created in order to save the card details after submitting the form in a more secure way.
- Type: string (required)
- Possible Values:
- Token
Definition: Created before the payment in complete, in order to save the card and do a charge later
Example:var scope:String = "Token" - AuthenticatedToken
Definition: This is a token created and authenticated by the customer. Which means that the customer entered the card information and also passed the Authentication step (3DS) and got the token after.
Example:var scope:String = "AuthenticatedToken" - SaveToken
Definition: This is used in case you want to have the card information saved in a token, however you want the customer to go through the authentication step (receive OTP or PIN) each time the card is used.
Example:var scope:String = "SaveToken" - SaveAuthenticatedToken
Definition: This means you will get an authenticated token to use in multiple times right away.
Example:var scope:String = "SaveAuthenticatedToken"
- Token
purpose
- Definition: This will identify the reason of choosing the type of token generated in the scope field, like if it will be used for a single transaction, recurring, saving the token, etc...
Note: Only choose the option that suits your needs best. - Type: string (required)
- Possible Values:
- Transaction:
Definition: In case the token will be used only for a single charge request.
Example:var purpose:String = "Transaction" - Milestone Transaction:
Definition: Using the token for paying a part of a bigger order, when reaching a certain milestone.
Example:var purpose:String = "Milestone Transaction" - Instalment Transaction:
Definition: Using the token for a charge that is a part of an instalment plan.
Example:var purpose:String = "Instalment Transaction" - Billing Transaction:
Definition: Using the token for paying a bill.
Example:var purpose:String = "Billing Transaction" - Subscription Transaction:
Definition: Using the token for a recurring based transaction.
Example:var purpose:String = "Subscription Transaction" - Verify Cardholder:
Definition: Using the token to verify the ownership of the card, in other words, making sure of the identity of the cardholder.
Example:var purpose:String = "Verify Cardholder" - Save Card:
Definition: Using the token to save this card and link it to the customer itself.
Example:var purpose:String = "Save Card" - Maintain Card:
Definition: Used to renew a saved card.
Example:var purpose:String = "Maintain Card"
- Transaction:
order
- Definition: This defined the details of the order that you are trying to purchase, in which you need to specify some details like the id, amount, currency ...
- Type: Dictionary, (required)
- Fields:
- id
Definition: Pass the order ID created for the order you are trying to purchase, which will be available in your database.
Note: This field can be empty
Example:var order = HashMap\<String, Any>(), order.put("id","") - currency
Definition: The currency which is linked to the order being paid.
Example:order.put("currency","SAR") - amount
Definition: The order amount to be paid by the customer.
Note: Minimum amount to be added is 0.1.
Example:order.put("amount",1) - description
Definition: Order details, which defines what the customer is paying for or the description of the service you are providing.
Example:order.put("description","") - reference
Definition: This will be the order reference present in your database in which the paying is being done for.
Example:var order = HashMorder.put("reference":"A reference to this order in your system"))
- id
merchant
- Definition: It is the Merchant id that you get from our onboarding team. This will be used as reference for your account in Tap.
- Type: Dictionary (required)
- Fields:
- id
Definition: Generated once your account with Tap is created, which is unique for every merchant.
Example:var merchant = HashMap\<String,Any>.put("id","")
- id
invoice
- Definition: After the token is generated, you can use it to pay for any invoice. Each invoice will have an invoice ID which you can add here using the SDK.
Note: An invoice will first show you a receipt/summary of the order you are going to pay for as well as the amount, currency, and any related field before actually opening the payment form and completing the payment. - Type: Dictionary (optional)
- Fields:
- id
Definition: Unique Invoice ID which we are trying to pay.
Example:var invoice = HashMap\<String,Any>.put("id","")
- id
customer
-
Definition: Here, you will collect the information of the customer that is paying using the token generate in the SDK.
-
Type: Dictionary (required)
-
Fields:
-
id
Definition: This is an optional field that you do not have before the token is generated. But, after the token is created once the card details are added, then you will receive the customer ID in the response which can be handled in the onSuccess callback function.
Example:var customer = HashMap\<String,Any> ,customer.put("id,""), -
name
Definition: Full Name of the customer paying.
Fields:- lang
Definition: Language chosen to write the customer name. - first
Definition: Customer's first name. - middle
Definition: Customer's middle name. - last
Definition: Customer's last name.
Example:
var name :HashMap\<String,Any> = \[["lang":"en","first":"TAP","middle":"", "last":"PAYMENTS"]] - lang
-
editable
Definition: The customer's name on the card he is paying with, also known as cardholder name.
Note: It is of type Boolean, and indicated whether or not the customer can edit the cardholder name already entered when the token got created.
Example:customer.put("editable",true),) -
contact
Definition: The customer's contact information like email address and phone number.
Note: The contact information has to either have the email address or the phone details of the customers or both but it should not be empty.
Fields:- email
Definition: Customer's email address
Note: The email is of type string. - phone
Definition: Customer's Phone number details- countryCode
- number
Example:
"contact":\["email":"[[email protected]](mailto:[email protected])", "phone":["countryCode":"+965","number":"88888888"]]] customer.put("name",name) , customer.put("contact",contact)\` - email
-
nameOnCard
Definition: Pre-fill the cardholder name already received once the payment form is submitted.
Example:customer.put("nameOnCard","Tap Payments")
-
features
-
Definition: Additional functionalities to be added in order to make the payment gateway experience more customisable for your needs, like showing the accepted card brands on the payment form, save card toggle button...
-
Type: Dictionary (optional)
-
Fields:
-
acceptanceBadge
Definition: A boolean to indicate wether or not you want to display the list of supported card brands that appear beneath the card form itself.
Example:var features=HashMap\<String,Any> features.add("acceptanceBadge":true) -
customerCards
Definition: You will have the option to display either the toggle button that allows to save the card or the autosave card.
Fields:- saveCard
Definition: A boolean to indicate wether or not you want to display the save card option to the customer.
Must be used with a combination of these 2 scopes either SaveToken or SaveAuthenticatedToken. - autoSave
Definition: A boolean to indicate wether or not you want the save card switch to be on by default.
Example:
features.add("customerCards":HashMapof("saveCard":false, "autoSaveCard":false) - saveCard
-
alternativeCardInput
Definition: You can also, either add the card information by scanning the card or by using NFC.
Note: In order for that to work, you will need to add the Camera permission to your manifest file like so<uses-permission android:name="CAMERA" />Fields:
- cardScanner
Definition: A boolean to indicate whether or not you want to display the scan card icon. - cardNFC
Definition: A boolean to indicate whether or not you want to display the NFC icon.
Example:
features.add( "alternativeCardInputs":HashMapof("cardScanner":true, "cardNFC":true)\` - cardScanner
-
acceptance
- Definition: This will help in controlling the supported payment schemes, like MasterCard and Visa, and the fund source either being debit or credit card and you will also be able to check if you want the customers to complete the 3DS phase (Authentication) or not.
- Type: Dictionary (optional)
- Fields:
- supportedSchemes
Definition: A list to control which card schemes the customer can pay with, note that he can choose more than one card scheme.
Possible Values:- AMERICAN_EXPRESS
- VISA
- MASTERCARD
- MADA
- OMANNET
Example:
var acceptance = HashMap\<String,Any> , acceptance.put("supportedSchemes",["AMERICAN_EXPRESS","VISA","MASTERCARD", "OMANNET","MADA"]), - supportedFundSource
Definition: A list to control which card types are allowed by your customer.
Possible Values:- Debit
- Credit
Example:
acceptance.put("supportedFundSource",["CREDIT","DEBIT"]), - supportedPaymentAuthentications
Definition: A list of what authentication techniques you want to enforce like 3DS authentication
Example:acceptance.put("supportedPaymentAuthentications",["3DS"])
- supportedSchemes
fieldVisibility
- Definition: A boolean to indicate wether or not you want to show/collect the card holder name.
- Type: Dictionary (optional)
- Fields:
- card
- cardHolder
Definition: The person that is paying using credit or debit card.
Example:var fieldVisibility = HashMap\<String,Any> ,fieldVisibility.put("cardHolder",true)\`
- cardHolder
- card
interface
- Definition: This will help you control the layout (UI) of the payment form, like changing the theme light to dark, the language used (en or ar), ...
- Type: Dictionary (optional)
- Fields:
- loader
Definition: A boolean to indicate wether or not you want to show a loading view on top of the card form while it is performing api requests.
Example:var interface = HashMap\<String,Any> interface.put("loader",true) - locale
Definition: The language of the card form. Accepted values as of now are:
Possible Values:- en(for english)
- ar(for arabic).
Example:
interface.put("locale","en"), - theme
Definition: The display styling of the card form. Accepted values as of now are:
Options:- light
- dark
- dynamic ( follow the device's display style )
Example:
interface.put("theme","light") - edges
Definition: Control the edges of the payment form.
Possible Values:- curved
- flat
Example:
interface.put("edges","curved") - cardDirection
Definition: The layout of the fields (card logo, number, date & CVV) within the card element itself.
Possible Values:- ltr
Definition: The fields will inflate from left to right. - rtl Definition: The fields will inflate from right to left.
- dynamic
Definition: The fields will inflate in the locale's direction.
Example:
interface.put("direction","dynamic"), - ltr
- powered
Definition: A boolean to indicate wether or not you want to show powered by tap.
Note, that you have to have the permission to hide it from the integration team. Otherwise, you will get an error if you pass it as false.
Example:interface.put("powered",true), - colorStyle
Definition: How do you want the icons rendered inside the card form.
Possible Values:- colored
- monochrome
Example:
interface.put("colorStyle","colored"),
- loader
post
-
Definition: Here you can pass the webhook URL you have, in order to receive notifications of the results of each Transaction happening on your application.
-
Type: Dictionary (optional)
-
Fields:
- url
Definition: The webhook server's URL that you want to receive notifications on.
Example:var post = HashMap\<String,Any>.put("url","")
- url
Updated 8 months ago